One thing I've come across in my relentless pursuit to know everything about digital post is the ACES (Academy Color Encoding Specification) colour space and how it can be implemented in post-production workflows. Why should you care about this? Well, if your concerned about making beautiful images you should know about it because it can improve colour rendition and help you bring footage from various different cameras (that all "see" the world differently) into line with each other. Now, whilst reading this please bear in mind that I'm only just dipping my toe into this world. ACES is used in the highest end film workflows and I'm really only just grasping the basics here.
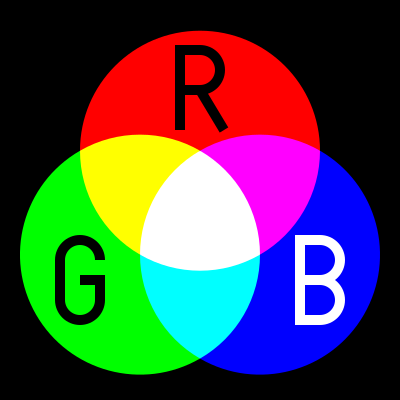
To understand ACES, you first need to know what a colour space is. Before that though, you should understand the concept of a colour model. A colour model is the method you use to create the colours you see (on screen or on a piece of paper). One typical colour model is the RGB model. It is additive, in that it adds together different amounts of Red, Green and Blue to create the colour that you want. Full Red, full Green and full Blue would result in white. It assumes the base level of the display is black and then adds to that. This is the opposite to the CMYK colour model used in printing which assumes the medium is white and then combines colours to subtract from the light that the paper reflects, the more colour, the darker it gets.
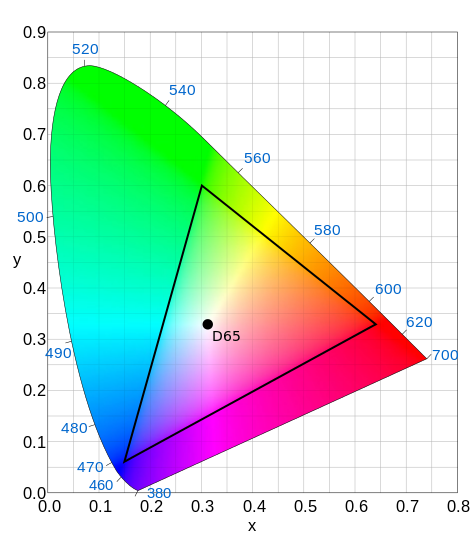
If a colour model determines how you create the colours, the colour space determines which colours you can create. Our eyes are capable of seeing a huge range of different hues and levels of saturation. This is the visual spectrum. But most displays (eg. televisions and projectors) aren't capable of producing all of the colours we are able to see. They have a narrower gamut than our eyes. If the display we are going to see the end result on cannot produce a colour, there is little point in creating a digital file to send to it that contains colours outside that gamut. Colour spaces define a subset of the colour range that can be stored in a digital file and reproduced on the intended display. Two of the most common colour spaces you will see are BT601 (used in standard definition television) and REC709 (used in high definition television). As you can see from the image below, these colour spaces hold quite a small subset of the range of colours our eyes are able to see (the inner triangle is REC709, the outer horseshoe is what our eyes are capable of).
A lot of video cameras record this narrow range of hue and saturation values because they are designed to be shown on TVs that can only reproduce this range anyway. Until better technologies like OLED become the standard in peoples homes, this will continue to be the standard. However, many cameras are capable of recording something much better than the limited range available in REC709. These cameras can either record in a LOG colour space which maximises the range of colours and brightnesses the camera captures flattening the values down into the REC709 space resulting in image that initially looks low contrast and desaturated. Or, they record RAW which means that they literrally just capture the numbers as they come off the sensor. Whatever the sensor is capable of seeing is recorded and it is not interpreted into any given colour space before being stored.
Both LOG and RAW footage needs to be interpreted in some way in post production. A Look-up-Table (LUT) can be used to convert the footage into something which looks like a regular REC709 image that our eyes are used to viewing. Essentially you are stretching the flat image out so it takes up the whole REC709 range. The benefit of doing this in post rather than just using a camera that records REC709, is that there may be hue or brightness values that, once the image is stretched out, stray outside the REC709 range. If you had recorded in REC709 on the camera, those would have been clipped and lost forever. After applying a LUT, you still have access to those ranges and you can easily select them and bring them back into the REC709 space if required.
So even if your end product will be delivered in REC709 space, recording in a format that can capture a greater range of colour and brightnesses is a good idea. It gives you a failsafe to help you grade the images more effectively and correct any accidental over or underexposure. And if your images will be delivered in a colour space with a bigger range (like DCI-P3 used in digital cinema projectors) there is even greater reason.
One problem with this workflow is that once you have applied your LUT to bring your image into the colour space of your delivery format your corrections are restricted to what can be done within that space. You will also only see what your output will look like in that colour space and if you need to create a DVD/Bluray and also a Digital Cinema Print, you may need to repeat some of your work in two different colour spaces. You are also possibly shooting yourself in the foot in terms of future proofing. Archiving is only useful if you can archive something that will be adaptable to future standards. Standard definition scans of films became irrelevant once high definition became the norm and any work done now in a limited gamut colour space might become irrelevant once when displays with larger gamuts become the norm. This is why ACES (Academy Color Encoding Specification) was created.
The main point of ACES is that, as colour space, it contains the entire visible spectrum with plenty of leeway to push brightness and colours back and forth without ever clipping values. The main points at which it is currently used in post-production pipelines are during the creation of dailies for the editor and in the grade. My experience of using it so far has been in DaVinci Resolve. I tested the workflow of grading in the ACES colour space using a piece of ARRIRAW footage which you can obtain from the Convergent Design (makers of ARRIRAW recorder, the Gemini 4:4:4).
Bring the footage into Resolve and the RAW image will seem flat and desaturated. The standard colour space in Resolve is YRGB which is slightly wider than REC709, but this image needs to be stretched out to fit that colour space. We could add a LUT to the image and carry on working, but instead you can change the colour space of Resolve to ACES in the Master Project Settings.
In order for this to work there is one more step you need to take and that is setting up the IDT (Input Device Transform and the ODT (Output Device Transform). You can do that in the Look Up Tables settings.
The IDT tells Resolve which camera the footage was shot on. It is a blueprint of how that camera "sees" the world. That image is then converted into the ACES colour space which can hold all the information in the original file. This should flatten the playing field between different cameras as they enter a shared colour space, but obviously it can't create quality where there is none and cameras with lower bit depth, dynamic range etc. will still look worse. I have read that ideally you should be using not just a general IDT for your manufacturer, but something generated from your camera with the lens you are using. Sounds crazy, but using a general IDT is certainly a start.
The ODT tells Resolve what type of display you are going to watch the footage on. It converts the image out of the ACES space and into an image which will look good on your monitor. Here I have chosen Rec.709 because I view my images on a Plasma screen hooked up to computer via a Black Magic I/O box. Again an ODT should be tailored to your specific display for best results but the Rec.709 one should look good on a calibrated Rec.709 display.
Now without the need of a LUT, the image looks correct on the monitor and on the interface and you're ready to start grading. Below is an image and a video which shows the results of my comparison between using a LUT in YRGB and using ACES on this ARRIRAW footage. I did a slight correction to the contrast on both after that, and those images can be seen here to.
Now, as a starting point going into a grade, I definitely prefer the look of the ACES image. The colours just look better and if I can implement this on an upcoming job I definitely will. There are however, a few things to get used to with ACES. First, any manipulation of the metadata that can usually be done with RAW footage is no longer possible. So you can't go in and change the ISO or White Balance. This sounds bad, but it doesn't really make a difference. The gamut of ACES is so wide that changing the exposure or white balance in the metadata wouldn't give any better results than simply shifting the controls around in Resolve. Any data currently outside of the colour space your viewing in isn't lost, its just hanging over the edge of your display gamut and can be easily brought back. The other thing to get used to is that the controls in Resolve feel very different than when operating in YRGB space. I'm assuming this is something one gets used to, but at the minute I have a hard time making corrections as they seem to do something slightly different than what I am expecting, especially the Lift, Gamma, Gain controls in which the range of influence seems to be shifted slightly. I have been told this is something that improves with every version of Resolve and it gets closer to how it feels using these controls in YRGB with each version.
Well this has taken me quite a long time to produce, so I hope someone out there finds it useful. Its basically the sum of all my colour science knowledge. As the quality of digital cameras increases and the price decreases, knowing this kind of stuff is what will separate professional image makers from amateur ones. And whether your a colourist, a DOP, a makeup artist or a set dresser, knowing how your work will end up looking on the big screen (or the small screen) is pretty important. Obviously not everyone needs to understand this in depth, but a little knowledge can go a long way.


This comment has been removed by the author.
ReplyDeleteAmazingly well detailed and informative post. I found it very interesting. Thank you for the knowledge and words of wisdom..
ReplyDeleteThank your very much! I'm a student from Germany and this really helped me a lot to get started with ACES. I'm planning to do my bachelor thesis about the ACES workflow and the presentation from the official Academy homepage rather disturbed me than cleared some things.
ReplyDelete